Design guide · Updated October 2026
Coffee Bag Design Guide and Free Dieline Templates
Packluma's free flat bottom coffee bag dieline templates come in seven standard sizes, from 90 × 185 × 55 mm (about 100 g) to 145 × 335 × 100 mm (about 1 kg).
Roasters including MixCoffeeBeans and Cold Creek Coffee print with Packluma.
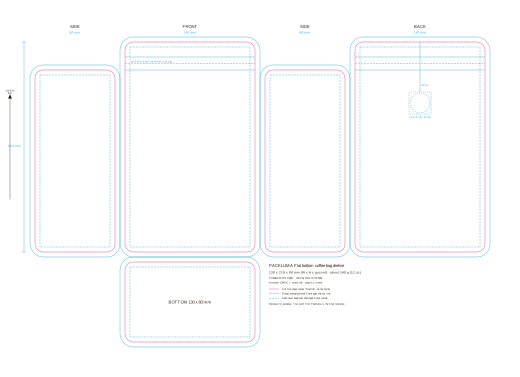
- Bleed 5 mmExtend your background 5 mm past the cut line.
- Safe area 5 mmArtwork needs 5 mm bleed past the cut line and a 5 mm safe area inside it.
- CMYK + whiteDigital printing uses CMYK full colour plus white ink.
- Five panelsEach template is a 1:1 vector PDF with five panels: front, back, two side gussets and the bottom.
Free templates
Download a flat bottom bag dieline
Start your coffee bag design on the template for your bag size. Download the 1:1 vector PDF; the SVG is a quick preview you can open in a browser. Not sure which size you need? See the coffee bag size guide or the flat bottom coffee bags page.
| Size (W × H × gusset) | Fill | Download |
|---|---|---|
| 90 × 185 × 55 mm | about 100 g (3.5 oz) | PDF template · SVG preview |
| 125 × 195 × 65 mm | about 250 g (8.8 oz) | PDF template · SVG preview |
| 140 × 240 × 60 mm | about 250 g (8.8 oz), larger print area | PDF template · SVG preview |
| 130 × 210 × 80 mm | about 340 g (12 oz) | PDF template · SVG preview |
| 130 × 210 × 80 mm 22 mm easy-tear back zipper (hand filling) | about 340 g (12 oz) | PDF template · SVG preview |
| 135 × 255 × 80 mm | about 500 g (1.1 lb) | PDF template · SVG preview |
| 180 × 280 × 80 mm | about 500 g (1.1 lb), larger print area | PDF template · SVG preview |
| 145 × 335 × 100 mm | about 1 kg (2.2 lb) | PDF template · SVG preview |
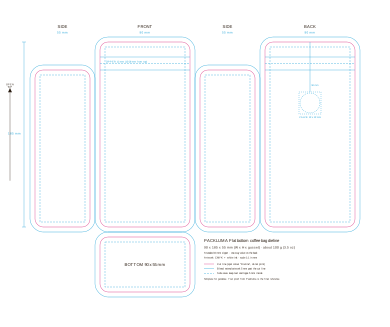
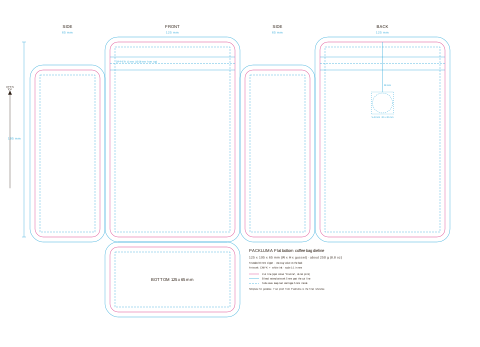
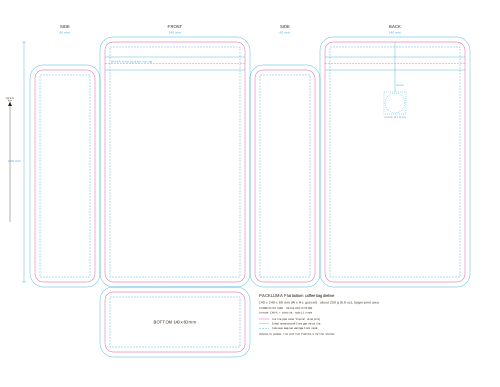
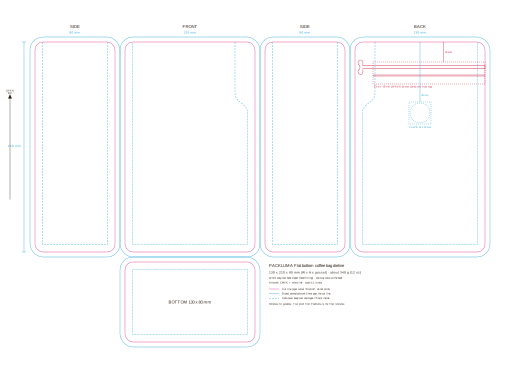
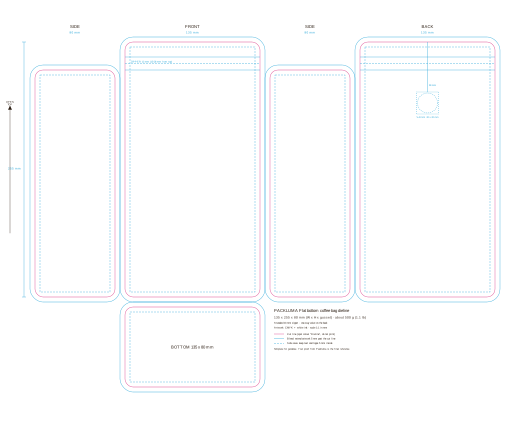
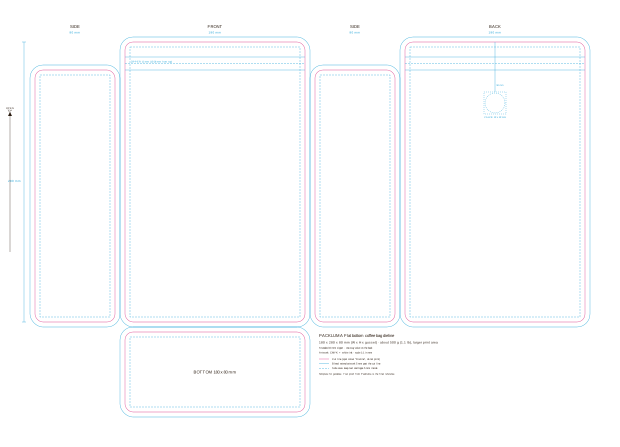
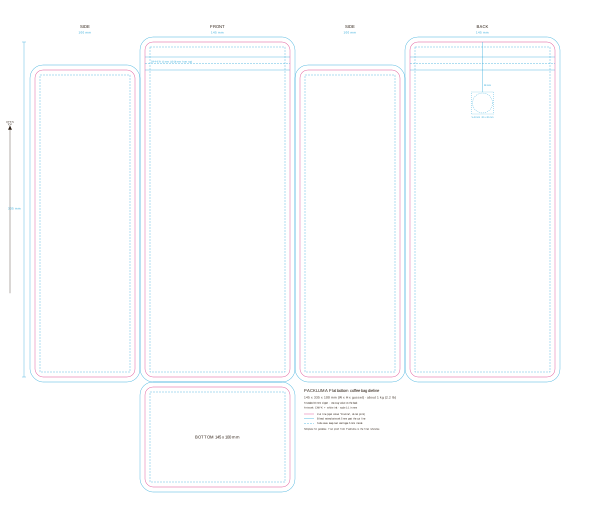
These are standard factory sizes. Fill is approximate for whole beans, and you confirm the final dimensions on your proof.
Reading the template
How to read the template
- Magenta lineThe cut line, set as the spot colour "Dieline". Do not print it, and keep it on its own layer.
- Solid cyan lineThe bleed edge, 5 mm outside the cut line. Extend your background to this line.
- Dashed cyan lineThe safe area, 5 mm inside the cut line. Keep text, logos and barcodes inside it.
- Zipper bandThe standard zipper sits 15–28 mm below the top edge. The side gussets start below it, so their print area is shorter than the front panel. For hand filling we recommend a 22 mm easy-tear zipper on the back instead. It changes the layout, so download the 12 oz easy-tear version from the table above, or ask for it in another size.
- Valve positionThe one-way valve (22 × 22 mm) sits on the back panel about 50 mm from the top. Keep artwork details clear of it.
- Open direction arrowThe arrow points to the top of the bag, so you can check the artwork orientation.
Checklist
Artwork checklist before you send files
- Put your artwork on a layer separate from the dieline.
- Extend the background 5 mm past the cut line.
- Keep text, logos and barcodes inside the safe area and out of the zipper band and the valve area.
- Set the colour mode to CMYK.
- Mark any areas that should print in white ink.
- Outline your fonts or embed them.
- Place images at 300 dpi at 100% size.
- Send an AI or PDF file with vectors kept editable.
For how the artwork is printed, read the coffee bag printing guide.
Other formats
Stand-up pouches and custom sizes
- Packluma sends stand-up pouch templates and custom-size dielines on request with your quote.
- Stand-up pouches print on the front and back.
See stand-up coffee pouches, flat bottom coffee bags and the coffee bag size guide.
Proofing
Proofing before printing
- Free mockupEvery quote includes a free design mockup.
- First-bag photosBefore mass production we send photos of the first bag with ruler measurements.
- Your approvalYou approve the first bag before we continue.
- Finished bagsBefore shipping we send photos and video of the finished bags.
Send your artwork or idea
Tell us your bag style, size and quantity. We reply within 24 hours with an exact price and a free design mockup.
FAQ
Coffee bag dieline FAQ
What is a coffee bag dieline?
A coffee bag dieline is a flat drawing of every panel of the bag with its cut line, bleed and safe area, so you can place your artwork on it. Packluma templates are 1:1 vector PDFs.
Are the dieline templates free?
Yes. Download any of the seven flat bottom sizes from this page, from 90 × 185 × 55 mm (about 100 g) to 145 × 335 × 100 mm (about 1 kg), with no sign-up.
How much bleed does the artwork need?
Artwork needs 5 mm bleed past the cut line. Extend your background to the solid cyan bleed line on the template.
What is the safe area?
The safe area is 5 mm inside the cut line, shown as the dashed cyan line. Keep text, logos and barcodes inside it, and out of the zipper band and the valve area.
Which file format should I send?
Send an AI or PDF file with vectors kept editable, with fonts outlined or embedded and images placed at 300 dpi at 100% size.
Should my artwork be CMYK or RGB?
Use CMYK. Digital printing uses CMYK full colour plus white ink, so mark any areas that should print in white ink.
Where does the valve go on the template?
The standard zipper sits 15–28 mm below the top edge, and the one-way valve (22 × 22 mm) sits on the back about 50 mm from the top. Keep artwork details clear of both.
Can I get a template for a custom size or a stand-up pouch?
Yes. Send us the size with your quote request and we send the matching dieline.
Can Packluma design the bag for me?
Every quote includes a free design mockup, so you can send a logo or an idea instead of finished artwork. We reply within 24 hours, and digital printing starts at 500 bags per design.